alpine
How to Buy an Alpine Snowboard
By Jack Michaud
NOTE: A lot has happened in the hard boot world since this article was written, but a lot of the concepts listed here are basic concepts that are true for every hard boot board. Please see this article on the updates to the technology in the world of hard boot snowboarding. The last tried and true method of buying skis before the whole shaped-ski revolution was to buy the pair that reached to your wrist when you raised your arm straight above your head. But there never has been such a rule for snowboards. That’s because accomplished carvers can use just about any board within a 40- centimeter range or more, and enjoy them all for different purposes. If you’re new to buying alpine snowboards, or if you need some ideas for your next deck, consider these guidelines:
1. Length
The length of your alpine snowboard generally determines three things: maneuverability (i.e., how easy it is to not carve it), stability at speed, and edge hold. The longer the board is, the more difficult it is to quickly change direction. This is almost a non-issue when carving, because we are not trying to steer or force the board to change direction. However, this is a significant issue when not carving, which is what you will be doing a good deal of while learning, or riding un-groomed terrain. If you are new to alpine boards, a deck that stands somewhere between your chin and your nose will be a good start. The shorter a board is, the less stable it will be at higher speeds. This is also due to the fact that sidecut radii generally decrease and increase with board size. A shorter radius wants to turn more, but we’ll cover that below. Longer boards are more stable at speed for many reasons. By their sheer length and weight, they are generally more damp, meaning they resist vibration. They won’t be unsettled as easily by sudden changes in the quality or smoothness of the snow surface. If the impact of such changes can be spread out over a longer length, the result is less disturbance to the overall system. Other vehicles that gain stability with length include skateboards, surfboards, sailboards, motorcycles, and boats, to name a few.
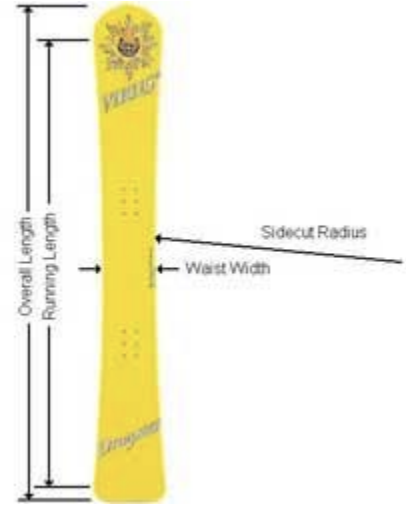
Edge hold relies largely on stability, which is why longer boards have more of it, and why snowboard and ski racers alike use quite long boards for higher speed events such as Giant Slalom and up. The physics of edge hold is a somewhat complicated matter that doesn’t need to be discussed in depth here. It is true that at one extreme, an “edge” shrunken to a single point will have ultimate holding power, which is why ice-climbers use ice axes and crampons. But you’ll never see ski racers using snow-blades, nor snowboard racers using 150’s in a GS course. There’s a lot to be said for stability when it comes to edge hold, but while learning you won’t be going fast enough to need a very long board. Most manufacturers list a “running length” and sometimes “effective edge length” in addition to overall length. Running length is the overall length minus the length of the upturned nose and tail. Boards that are intended for the same purpose like racing, freecarving or all-mountain carving usually have quite similar ratios of overall length to running length. Boards with less running length will be easier to handle off the groomed path, but sacrifice a little edge grip. Effective edge length is really a useless number as it is the actual length of the edge, measured along the curve of the sidecut. Two boards with the same running length but different sidecut radius will have different effective edge length, but who cares?
2. Sidecut Radius
First of all, “radius” is the term for the distance from the center of a circle to its edge. The sidecut is a curve cut into the side of the board that is part of a big circle with a certain radius. Some boards have a slightly different sidecut shape, like a parabola, an ellipse, a blend of two or more radii, or some other curve. For convenience and comparability, all descriptions of sidecuts refer to a radius, or equivalent radius, measured in meters.
When carving, the shape of our turns resemble half-circles sliced into the snow. Without sidecut, we would simply rail right into the woods, in a straight line. As we tilt the board up on edge, the sidecut allows it to bend into an arc that describes the shape of the carve. The higher the edge angle, the more the board bends, and the tighter the carve becomes. The sidecut radius is the measurement of the curve in the side of the board when the board is flat on the ground. Therefore, this number is actually slightly larger than the largest radius turn the board will carve. By “carve” we mean a turn where the entire edge slices cleanly through the same track in the snow without any sideways sliding.
Speed and turn radius share an inverse relationship. That is, the faster you go, the tighter you will be able to carve a given sidecut, to a point. Two boards with different sidecut radii can carve the same size turn, but the board with the longer radius will have to do it at a higher speed. As with snowboard length, larger sidecuts will be more stable at higher speeds, but less usable in tight spaces or crowds. In fact, large radii are not even carvable at slower speeds. Small radii will oscillate or chatter if ridden beyond their speed envelope.
Radii in the range of 8 to 11 meters, depending on your physical size, are usually used for slalom racing, shorter turns, and slower speeds. This is a good range for a first alpine board because you will be able to carve the board at speeds within your comfort zone. Consider also the width of the trails you usually ride, and the crowds you have to navigate.
3. Waist Width
The waist width is measured straight across the board at its narrowest point, usually in millimeters. The narrower the board, the quicker it will be from edge to edge, and it will feel more lively. The wider the board, the easier it will be to ride on varied terrain, and it will feel more relaxed between carves. When going from a wider board to a narrower board, you may feel like the narrower board is less stable, but you will soon get used to it. Waist width is a personal taste; some professional racers won’t touch anything skinnier than a 200mm wide board, others no wider than 180mm.
For advanced carvers, stance angles in the neighborhood of 57-63 degrees have become the norm. For beginners, it will be easier to make the transition from softboot angles if you can stay around 50-55 degrees. If you’ve been carving it up well on your soft gear, you may be able to jump right into a more aggressive stance.
Your boot size and the waist width determine your stance angle. The proper angles to use are those at which your toes and heels are as close to the edges of the board without hanging over. As a beginner you will be able to get away with a little more overhang because you probably won’t be tilting the board up that high. As you progress, you will need to angle your bindings more to avoid boot drag. Choose a board with a waist width that will accommodate your boot size at a desirable angle.
4. Stiffness
Unfortunately there is no universal measurement for board stiffness like there is for sidecut, yet. After you’ve owned and experienced three or so boards, you’ll be able to flex boards by hand and get an idea of their stiffness characteristics. Ideally, you want a board’s stiffness to be matched to your weight and how fast you intend to ride it.
Higher speeds generate higher g-forces, and the board needs to be stiff enough to balance them. A board that is too soft for your weight and/or your speed will fold up and loose the carve. A board that is too stiff will feel unwilling to carve and will be more difficult to ride. Fortunately snowboard manufacturers have identified what size people usually ride what size boards. Also, the range of acceptable stiffness is not that narrow. Some boutique manufacturers can adjust the flex of a stock board to your weight without extra charge. Or, if you want to pay for a full custom, you can have a board built exactly to your every specification. However it is very likely that you will be able to pick a board off the shelf that will work very well for you.
5. Taper
Taper is the difference between the nose width and tail width, when the tail is slightly narrower than the nose. Some boards have it and some have none. A few even have reverse taper. The purpose of taper is to make the tail of the board release from the carve easier. To have taper or not is really a matter of taste. Some feel that it helps make a board quicker from edge to edge. Some people would describe the finish of a carve made by a board without taper as “hooky”, while others would say it is more positive and defined. Many all-mountain carving boards have taper to make skidded turns, varied terrain, and powder easier to deal with. If you’ve found a board that you think is the right length, width, and sidecut radius, don’t worry about taper, just buy the board, you probably won’t even notice. The only way to tell if you want a board with taper or not is to ride one.
6. Different Types of Alpine Boards
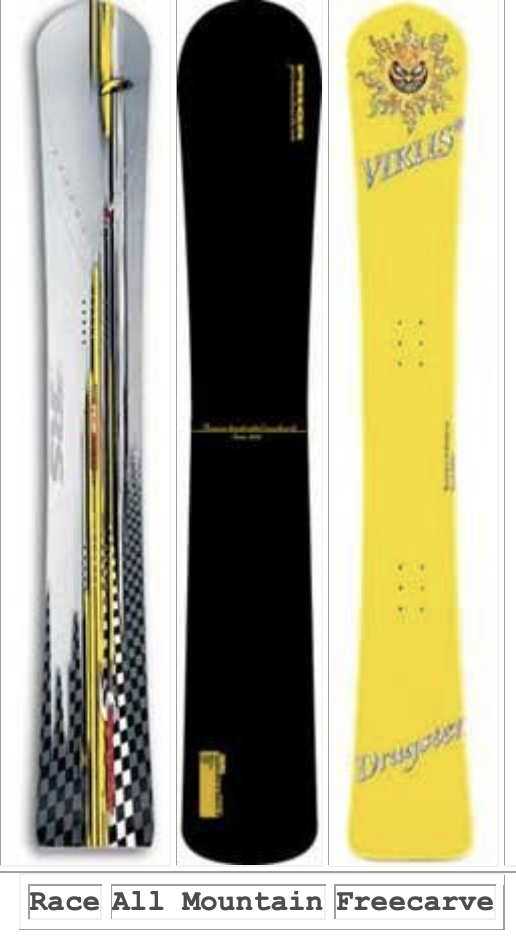
Alpine snowboards have evolved into three basic shapes: all-mountain, freecarve, and race. (sometimes the terms all-mountain and freecarve are used synonymously) Wolves in sheep’s clothing, all-mountain carving boards put enough running length on the ground and are stiff enough to really nail solid carves. But they also have longer, rounded noses and tails, and wider widths to be useful and very fun all over the mountain, including powder, bumps, and off-piste. They can be ridden with hardboots or softboots if you can fit your softboots on the board at realistic angles. If you like to put the smack down on the corduroy, and chase your softbooter friends all over the mountain, this is the board to get if you can only own one board. These are also excellent boards for beginner or casual carvers, and cross-over skiers, as they are the most forgiving of all carving boards. The round tail will do whatever you want, it doesn’t always try to lock into a carve. Cross-over skiers will enjoy these boards because you can jump on one with your ski boots on your first day of snowboarding ever, and stay with it as long as you like. Being able to switch from skis to board mid-day or vice versa is ultra convenient, and keeps everything fresh.
Freecarve snowboards are nearly race-shaped decks with slightly softer flex, and maybe a little extra width, and nose/tail length. They also usually have a tighter sidecut radius than a race board of the same length, so they will carve at lower speeds. They’re designed to be more forgiving, easier to learn to ride, and a bit easier to ride on varied terrain. These are good choices for people who want to get into carving and can afford two whole setups. They’re also good for lighter weight riders and people not interested in racing or blistering speeds.
Race boards are replicas of the boards used by professional racers, designed for ultimate speed and edge hold. But that doesn’t mean you have to be a racer to use them. These are the boards you aspire to mastering as you realize your own carving potential. They have minimal noses and tails, and are the stiffest boards available. On good conditions, a properly sized race board will take all you can dish out. On icy conditions, they will offer the most edge hold of any board, but it’s still up to you to deal with ice. Once you have been bitten by the race board bug, you will find yourself lusting after all sizes of race boards, from short boards that barely come up to your armpits for maximum flickability, to long boards that stand taller than your head for pulling high speed g’s on wide open corduroy. Just try not to tap into your retirement fund buying them all.